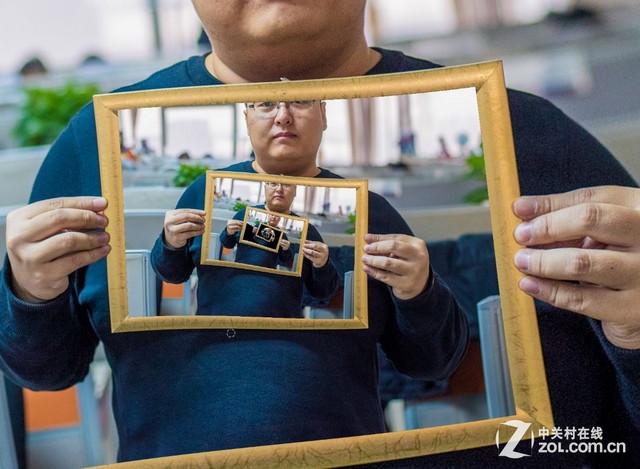
我们在理发厅、高档商场的厕所或者其它地方,如果你的前后刚好有两面镜子对立放置,你就会发现这么一个现象:你观看一面镜子,就会看到镜子里无限反射另一面镜子里的内容。当然,如果这个不够形象,大家可以拿着一个镜子(镜子A),站在另一面镜子(镜子B)前,然后透过镜子B观看镜子A里面的影像,就会看到笔者描述的这个无限递归的显示效果了,就像是空间穿越一样。这个现象,在摄影界有个学名叫做德罗斯特效应,但是这个名字太难记,笔者自己叫它“空间穿越效应”。

看到你晕倒 亲授空间穿越效应制作宝典
■ 什么是空间穿越效应(德罗斯特效应)?
德罗斯特效应是递归的一种视觉形式,是指一张图片的某个部分与整张图片相同,如此产生无限循环。
■ 德罗斯特效应的起源
德罗斯特效应的名称是由于荷兰著名厂牌德罗斯特(德罗斯特是创立于1863年的荷兰第一大巧克力品牌)可可粉的包装盒,包装盒上的图案是一位护士拿着一个有杯子及纸盒的托盘,而杯子及纸盒上的图案和整张图片相同。这张图片从1904年起开始使用,数十年间只进行了一些小幅的调整,后来成为一个家喻户晓的概念。诗人及专栏作家Nico Scheepmaker在七十年代起,开始使用“德罗斯特效应”此一词语。
■ 制作德罗斯特效应图片需要什么?
① 一张照片。不管你是想做什么类型的德罗斯特效应图片,你都需要有一张照片作为基础,可以是手持一个画框、可以是拿着相机镜头、可以是带着墨镜,当然也可以是拍摄一个自行车轮等等,总之是一张可以制作德罗斯特效应的照片即可。
② 一台电脑。对电脑的配置没有任何要求,只要能使用Photoshop和我们接下来要介绍的GIMP软件即可。
③ 对照片的要求。如果想要制作简单的德罗斯特效应图片,对照片没有任何要求,如上面图片那样,因为只需要用到Photoshop即可完成后期的过程。
但是如果想要制作本页第一张图那种螺旋递归的德罗斯特效应图片(也就是进阶的玩法),对于大家拍摄的照片就需要有一定的要求了。我们拍摄的照片最好将要制作螺旋或者其他形状递归的画框放在照片的正中央,这样后面的调整就会很容易。如果不在画面中央,我们后面的调试就会很受折磨,而且不一定能成功。至于为什么这么说,我们后面的进阶玩法中给大家详细的介绍。
■ 本文介绍什么?
① 简单玩法:使用Photoshop软件教给大家如何处理简单玩法的德罗斯特效应图片。
② 进阶玩法:使用Photoshop软件、GIMP软件搭配MathMap滤镜和相应代码来制作进阶版本的德罗斯特效应图片,这样大家可以获得诸如上面这张递归画框的图片效果。当然还有其它的效果样式,我们在后面也会为大家展示出来,并教大家如何调试出来。
接着,讲解正式开始。
首先,我们来教给大家如何制作简单的德罗斯特效应图片。制作简单的德罗斯特效应图片,需要一张拿着相框的照片,还有一台装有Photoshop软件的电脑。照片的方面没有太多的要求,如果没有相框,用白纸、镜子等等各种物体都可以代替,但是造型很奇特的物体在后期抠图过程中可能会比较受折磨。

先拍一张照片,照片中最好有个画框,其它类似物体也可以(请不要在意画框中的内容)
照片拍好之后,最好先处理一下照片,比如调调颜色、调调白平衡、调调亮度等等。调整照片可以用Photoshop,也可以用Lightroom,看大家的喜好。
照片调好之后,导入到Photoshop软件中,把相框中的原始图片删除掉,因为我们需要在这部分中填上新的照片。
将背景图层用鼠标拖拽到箭头指向的这个按钮,就得到了一个背景图层的拷贝图层。
以此类推,每次都是复制一个图层,然后将新复制的图层大小调整到刚好卡在上一层图层的画框中,直到我们基本上看不出来再有白色画框的显示画面为止。这种方法是最简单、最傻瓜化的德罗斯特效应图片的制作方法。虽然过程一直是重复的,很烦人,但是步骤很简单。大家可以拍一张照片在电脑中试试看。
如果说这种初阶的方法太简单、不满足,那么请接着往下看进阶玩法。
简单玩法是给初学者练练手、练练Photoshop入门技巧的,所以效果比较一般。但是我们接下来的进阶玩法,就能够带给大家很多的乐趣了。进阶的玩法,就不能够只使用Photoshop这个软件了,否则PS图片处理的工作量太大了。我们需要使用另一个名为GIMP的软件,搭配上MathMap滤镜和一段调试德罗斯特效应的代码即可完成制作需求。软件下载、代码请参见最后一页附录。

进阶玩法需要的软件工具
■ 如何安装软件?
第一步,先要安装GIMP软件,具体步骤如下图:
按照步骤安装好即可。安装完GIMP软件之后,我们需要将名为“windowscomplete”文件夹中的文件导入到GIMP软件的目录中(这一步就是在安装MathMap滤镜),具体操作如下:
到这一步,我们的GIMP软件和MathMap滤镜就都安装好了。
我们再重复一遍:
第一步:
将“mathmap.exe”、“libgsl.dll”、“libgslcblas.dll”这三个文件复制到GIMP软件的目录中,默认的路径是C:\Program Files\GIMP2\lib\gimp\2.0\plug-ins;
第二步:
将“mathmaprc”、“new_template.c”这两个文件复制到路径C:\Users\你的用户名\.gimp-2.8\mathmap中,如果没有“.gimp-2.8”、“mathmap”这两个文件夹,请新建。
安装好之后,我们打开GIMP软件,然后在滤镜-->常规-->MathMap这个路径里,已经可以看到MathMap滤镜,也就是说我们已经安装成功了,接下来就可以制作我们的进阶版德罗斯特效应图片了。
安装好软件和滤镜,我们接下来的就是用Photoshop处理照片。处理照片的目的是让GIMP软件更加容易的制作出德罗斯特效应图片,如果我们放直接拍摄的原图进行制作,很可能会因为无法完美拼接出效果而失败。首先还是拍摄一张想要制作德罗斯特效应的照片。

拍摄一张要制作德罗斯特效应的照片

在Photoshop中新建一个透明底的图层,将拍摄好的照片导入新建图层中
在Photoshop中新建一个透明底的图层,将拍摄好的照片导入这个新建的图层中,让后用“椭圆选框工具”在照片中镜头的中间部分选取一个圆形的区域,然后删除掉。为什么是选取一个圆形区域删除掉,因为我们想以镜头为一个画框,来实现我们的德罗斯特效应,镜头是圆形的,所以我们的画框自然也就要留出一个圆形的区域。如果是方形画框,我们就可以删除掉一个方形区域。

将图片制作成一个圆形
还是使用“椭圆选框工具”将图片整个制作成一个圆形,如上图的样子,尽量保证外层的圆和画面镜头里删除的圆是同心圆,这是为了方面后面的调整操作。如果外面继续保持原始照片的方形,会难以拼接出完美的德罗斯特效应图片。所有操作结束后,将这个图片保存为PNG格式即可。
用Photoshop软件处理好图片之后,我们就开始使用GIMP软件和MathMap滤镜来制作我们的德罗斯特效应图片了。首先是打开软件,导入我们处理好的PNG格式图片,然后选择滤镜-->常规-->MathMap-->MathMap滤镜。

导入图片,打开MathMap滤镜

选择上面的“Expression”界面,可以看到里面存在原始代码

将原始代码删除,复制粘贴我们的德罗斯特效应专用代码(代码在最后一页附录中)
按照上面的步骤,一步一步的操作调试,就可以得到最终的德罗斯特效应图片了。
■ 调试所用参数代码部分解析
(1)r1=.4; # r1 is the inner radius. r1 is greater than zero and less than r2(内层圆圈的半径参数,数值在0到外层圆圈半径参数之间,不能大于1,比如0.33);
(2)r2=1; # r2 is the outer radius. r2 is greater than r1 and less than 1(外层圆圈的半径参数,数值在内层圆圈半径参数到1之间,不能小于0,比如0.78);
(3)p1=1; # periodicity - the number of times the image will repeat per cycle(每一圈中图片重复倍数的参数);
(4)p2=1; # number of strands - the number of "arms" the spiral will have(每一个分支中螺旋的数量的参数);
(5)zoom=.1; #Between .1 and 10(缩放倍率参数,数值在0.1到10之间,比如1.5);
(6)rotate=-30; #Between -360 and 360(画面的旋转参数,数值在-360到360之间,比如-271);
(7)xShift=.2; #Between -1 and 1(水平方向左右位移参数,数值在-1到1之间,可以写小数点,比如0.84214123);
(8)yShift=0; #Between -1 and 1(竖直方向左右位移参数,数值在-1到1之间,可以写小数点,比如-0.6253245)。
第一次修改的时候会很茫然,不妨先从r1和r2两个参数开始调整,调整一个参数,预览一次效果,这样可以帮助大家更好的理解这几个参数修改的作用和效果。
■ 写在最后
简单玩法制作德罗斯特效应图片,只需要使用常用的Photoshop软件就可以完成了,作图的步骤也很简单,操作也很简单,对于新手尝鲜再适合不过了。如果晋级到进阶玩法之后,需要同时使用Photoshop软件、GIMP软件、MathMap滤镜和一段专用代码,这就需要大家同时能够理解和熟悉这些应用,然后再通过调整制作出进阶版的德罗斯特效应图片。进阶玩法适合喜欢钻研后期技术的发烧友使用。不论是简单玩法还是进阶玩法,刚开始制作的时候可能图片不够完美,但是多练习、多尝试、多调整,你的德罗斯特效应图片就会达到穿越时空的效果了。
接下来,我们给大家展示一些好玩德罗斯特效应图片,大部分都有一种空间穿越的效果,顺便我们也给大家奉上代码参数部分的数值以供参考。

空间穿越效应示例图1
设置参数:
(1)r1=.16
(2)r2=.97
(3)p1=1
(4)p2=1
(5)zoom=.4
(6)rotate=-50
(7)xShift=.1
(8)yShift=0
设置参数:
(1)r1=.282
(2)r2=.7
(3)p1=1
(4)p2=1
(5)zoom=.008
(6)rotate=-55
(7)xShift=.0
(8)yShift=0
设置参数:
(1)r1=.23
(2)r2=.66
(3)p1=1
(4)p2=1
(5)zoom=.1
(6)rotate=-35
(7)xShift=.2
(8)yShift=0
设置参数:
(1)r1=.25
(2)r2=.84
(3)p1=1
(4)p2=2
(5)zoom=.02
(6)rotate=-55
(7)xShift=.0
(8)yShift=0
设置参数:
(1)r1=.282
(2)r2=.7
(3)p1=3
(4)p2=1
(5)zoom=.2
(6)rotate=-55
(7)xShift=.0
(8)yShift=0
设置参数:
(1)r1=.32
(2)r2=.75
(3)p1=1
(4)p2=2
(5)zoom=.07
(6)rotate=-100
(7)xShift=.0
(8)yShift=0
GIMP软件下载://editorup.zol.com.cn/upload/201411/548900a64ea53.exe
MathMap滤镜下载://editorup.zol.com.cn/upload/201411/54890140622ac.zip
■ 制作图片相关代码
请大家复制粘贴以下的全部代码内容(替换掉所有软件中原始代码内容):
########################################
## Droste Effect code for Mathmap ##
## Original Code by Breic (Ben) ##
## Adapted by Pisco Bandito (Josh) ##
## Version 4.0 ##
## This version for Windows and Linux ##
########################################
#You may need to alter the values of the following 9 variables to suit your image.
r1=.4; # r1 is the inner radius. r1 is greater than zero and less than r2
r2=1; # r2 is the outer radius. r2 is greater than r1 and less than 1
p1=1; # periodicity - the number of times the image will repeat per cycle
p2=1; # number of strands - the number of "arms" the spiral will have
# procedural scaling and rotation
zoom=.1; #Between .1 and 10
rotate=-30; #Between -360 and 360
# Procedural Shifting
xShift=.2; #Between -1 and 1
yShift=0; #Between -1 and 1
##
# To avoid framing problems on the largest annulus when tiling based on transparency, look
# outside (levelsToLookOut) levels to see if something farther out should cover up this pixel
# Try setting to 0 to see framing errors; 1 should be sufficient unless you have three or more
# image layers contributing to some pixel (in which case set it to 2 or more). Larger values
# slow the code down, and may lead to floating point errors.
##
levelsToLookOut=3;
############################################################
############################################################
## You should not have to change anything below this line ##
############################################################
############################################################
imageX=W; # image size, in pixels
imageY=H;
minDimension=min(imageX, imageY);
## User Variables, set these on the User Settings Tab ##
retwist=user_bool("Do Not Retwist (Leave Unchecked for Droste Effect)");
retwist=!retwist;
##
# Tiling can be based on transparency (if the input image is a tiff), or simply based on the
# radius. Using transparency, there can be protrusions between different annular layers.
# Tiling based on transparency, you can decide whether you want to look inward or
# outward from a transparent pixel. For example, with a frame you'll want to look inward,
# while for a flower you'll want to look outward.
##
tileBasedOnTransparency=user_bool("Tile Based on Transparency?");
transparentPointsIn=user_bool("Transparency Points In?");
# Miscellaneous variables
true=1;
false=0;
epsilon=.01;
##Correct the Rotation Variable
rotate=pi/180*rotate;
##
# Droste-effect code starts here
# Set Droste effect parameters
##
alpha=atan(p2/p1*log(r2/r1)/(2*pi));
f=cos(alpha);
beta=f*exp(I*alpha);
# the angle of rotation between adjacent annular levels
if (p2 > 0)
then angle = 2*pi*p1;
else
angle =-2*pi*p1;
end;
##
# Code to set up the viewport properly
##
if (retwist) then
xbounds=[-r2,r2];
ybounds=[-r2,r2];
else
ybounds=[0,2.1*pi];
xbounds=[-log(r2/r1), log(r2/r1)];
end;
xymiddle=ri:[0.5*(xbounds[0]+xbounds[1]),0.5*(ybounds[0]+ybounds[1])];
xyrange=xy:[xbounds[1]-xbounds[0], ybounds[1]-ybounds[0]];
aspectRatio=W/H;
xyrange[0]=xyrange[1]*aspectRatio;
xbounds=[xymiddle[0]-0.5*xyrange[0],xymiddle[0]+0.5*xyrange[0]];
z=ri:[(xbounds[0]+(xbounds[1]-xbounds[0])*(x+W/2)/W)+xShift,(ybounds[0]+(ybounds[1]-ybounds[0])*(y+H/2)/H)+yShift];
if (retwist) then # only allow for procedural zooming/scaling in the standard coordinates
zinitial=z;
z=xymiddle+(z-xymiddle)/zoom*exp(-I*rotate);
else
zinitial=r1*exp(z); # save these coordinates for drawing a frame later
zinitial=zinitial*zoom*exp(I*rotate);
end;
##
# The Droste effect math all takes place over the next six lines.
# All the rest of the code is for niceties.
##
if (retwist) then
z2=log(z/r1);
else
z2 = z;
end;
logz=z2; # save these coordinates for drawing a grid later
z=p1*z2/beta;
rotatedscaledlogz=z; # save these coordinates for drawing a grid later
z=r1*exp(z);
## End Droste effect math
## Tiling
if (tileBasedOnTransparency && levelsToLookOut > 0) then
if ( transparentPointsIn) then ratio=r1/r2*exp(-I*angle); end;
if (!transparentPointsIn) then ratio=r2/r1*exp( I*angle); end;
z=z*exp(levelsToLookOut*log(ratio));
end;
##
# When tiling based on transparency, color is accumulated into the colorSoFar variable,
# while alphaRemaining tells how much remains for lower layers to contribute (initially 1,
# finally 0).
##
colorSoFar=rgba:[0,0,0,0];
alphaRemaining=1;
ix=minDimension/2*z[0];
iy=minDimension/2*z[1];
color=origValXY(ix,iy);
colorSoFar = colorSoFar + (color*(alpha(color)*alphaRemaining));
alphaRemaining=alphaRemaining*(1-alpha(color));
# do we need to look inward from the current point, or outward?
sign=0;
if (tileBasedOnTransparency) then
if ( transparentPointsIn && alphaRemaining > epsilon) then sign=-1; end;
if (!transparentPointsIn && alphaRemaining > epsilon) then sign= 1; end;
else
radius=sqrt(z[0]*z[0]+z[1]*z[1]);
if (radius < r1) then sign=-1; end;
if (radius > r2) then sign= 1; end;
end;
if (sign < 0) then ratio=r2/r1*exp( I*angle); end;
if (sign > 0) then ratio=r1/r2*exp(-I*angle); end;
##
# Iteratively move inward or outward, until
# the point has radius r in [r1, r2), if tileBasedOnTransparency=false
# or until alphaRemaining=0, if tileBasedOnTransparency=true
# In the latter case, we accumulate color at each step
##
iteration=0; maxiteration=10;
while (sign != 0 && iteration < maxiteration) do
z2=z*ratio;
z=z2;
rotatedscaledlogz=rotatedscaledlogz+ri:[0,-sign*angle];
ix=minDimension/2*(z[0]);
iy=minDimension/2*(z[1]);
color=origValXY(ix,iy);
colorSoFar = colorSoFar + (color*(alpha(color)*alphaRemaining));
alphaRemaining=alphaRemaining*(1-alpha(color));
radius=sqrt(z[0]*z[0]+z[1]*z[1]);
sign=0;
if (tileBasedOnTransparency) then
if ( transparentPointsIn && alphaRemaining > epsilon) then sign=-1; end;
if (!transparentPointsIn && alphaRemaining > epsilon) then sign= 1; end;
else
radius=sqrt(z[0]*z[0]+z[1]*z[1]);
if (radius < r1) then sign=-1; end;
if (radius > r2) then sign= 1; end;
end;
iteration=iteration+1;
end;
color=colorSoFar;
color=rgba:[color[0], color[1], color[2], 1]; # set the alpha value to 1 (it could be <1 if the loop terminated at iteration maxiteration)
#This last line is important, it returns the pixel value for the current pixel
color


推荐经销商